Manage integrations
Admin guide
Integrations are the upstream services your apps reach through the data broker. As an IT admin you control which services exist, the credentials they hold, and which apps may call them. This page walks the day-to-day workflow.
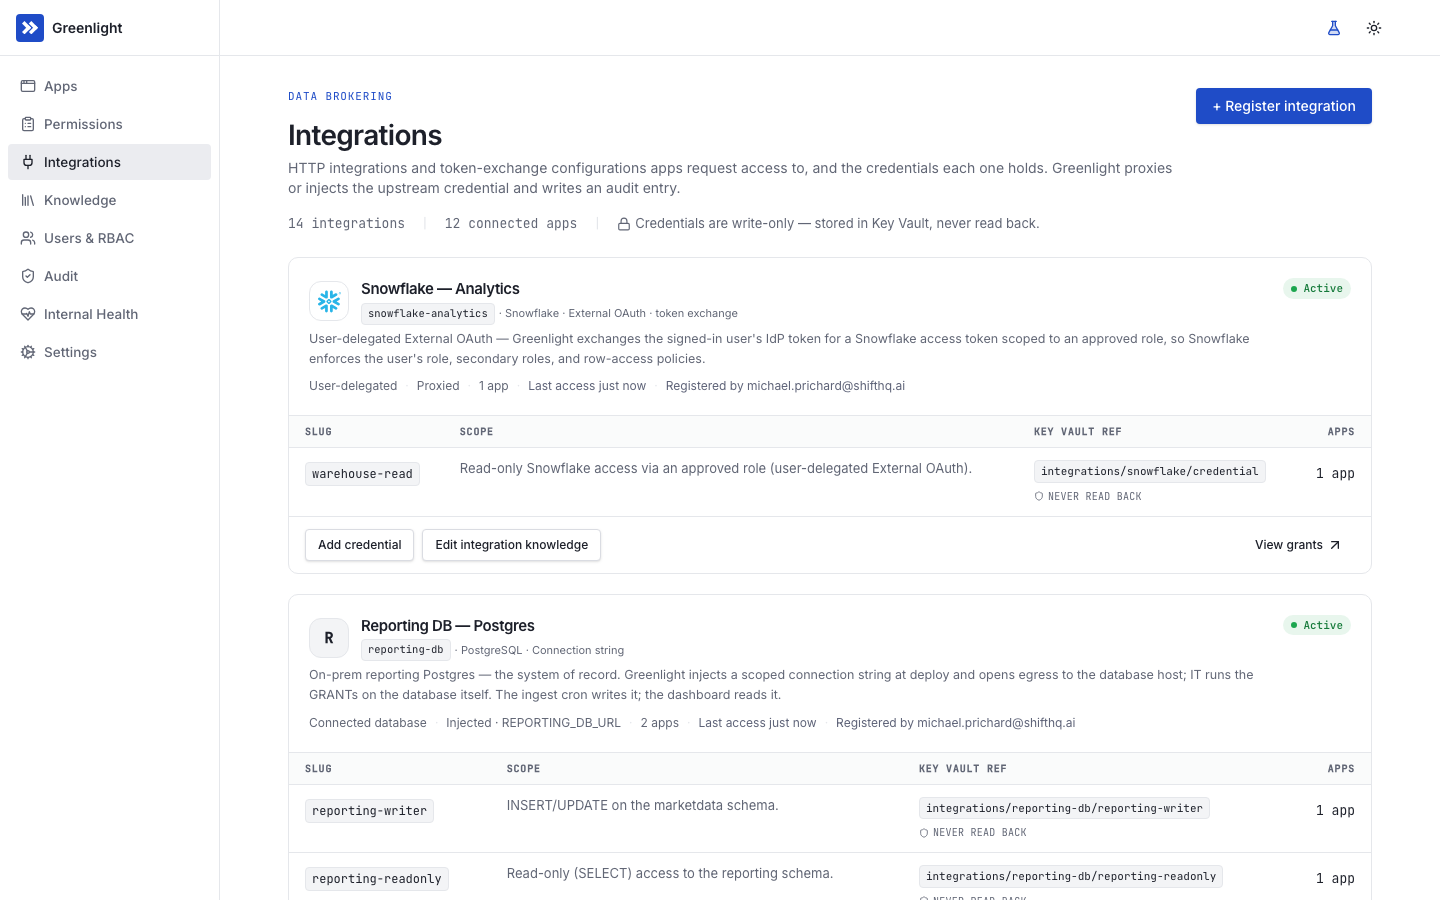
Each integration holds one or more named credentials. A credential is a stable slug (the handle an app binds a grant to — e.g. repo-readonly), a free-text scope describing what the key grants, and the secret itself. Apps request a specific credential by its slug. The registry card itself stays compact — the base URL you entered at registration (or the database host for a connected database) is confirmed through Edit integration. The architecture under every integration — the proxy, workload identity, per-call audit — is Data brokering.
How an integration authenticates
Section titled “How an integration authenticates”Every integration is classified by one question: how does Greenlight obtain the upstream credential, and whose identity does the upstream see? That single axis — the auth mode — has three values:
| Auth mode | What it means | Upstream sees |
|---|---|---|
| Service account | A static credential you paste once — API key, bearer token, or basic auth. | One shared identity for all app traffic. The default for most internal APIs. |
| Client credentials | OAuth 2.0 client-credentials; Greenlight mints and refreshes a machine token from the client id/secret you register. | A machine/application identity. |
| User-passthrough | OAuth token exchange — Greenlight swaps the signed-in user’s session for an upstream user-scoped token. | The actual end user, so upstream RBAC applies per person. |
For a service account, you also tell Greenlight where the static credential goes on the wire — an Authorization: Bearer header, basic auth, a custom header (e.g. X-Api-Key), or a query parameter — because not every API uses the same placement.
Slack, Google Workspace, Close, HubSpot, Asana, Fireflies, and Axiom ship as catalog entries with service-account auth; GitHub defaults to an org-owned GitHub App (client-credentials auth, with a personal access token as a non-default escape hatch); Snowflake and Salesforce ship as catalog entries with user-passthrough auth. Anything the catalog doesn’t cover is a build-your-own registration.
Register an integration
Section titled “Register an integration”Registration always creates the integration and its first credential together — there is no credential-less integration to clean up later. You start from the integration catalog: a searchable, logo’d list of curated upstreams (GitHub, Slack, OpenAI, Salesforce, Snowflake, …). Picking a catalog entry prefills the display name, machine name, base URL, auth mode, and credential placement, and shows you exactly how to obtain that provider’s credential. Display name, machine name, delivery mode, auth mode, credential placement, and any literal base URL are summarized in a closed Default settings section; expand it when you need to inspect or customize them. Per-customer URL values the catalog leaves as {placeholder} holes — a NetSuite account ID, a Teams tenant, a Jira site, a Salesforce My Domain — stay in the main flow as named fields with a live preview of the resolved URL. Templated catalog URLs stay out of Default settings; the named fields are how those URLs are filled. Proxied delivery is recommended whenever the catalog entry supports it. Provider-specific values you must supply, such as a Basic username or multi-header realm, remain in the main flow. For anything not in the catalog, Custom opens the same wizard with blank fields.
- Open the Integrations page. Click + Register integration.
- Pick a catalog entry — or Custom. A catalog entry (e.g. Slack, Azure SQL Database) prefills the fields below and surfaces step-by-step credential-acquisition instructions for that provider. Custom is for any HTTP API the catalog doesn’t ship.
- Name it and point it at the upstream. Always: a display name and a machine name (lowercase, alphanumeric with dashes — e.g.
hubspot-prod). Then, for an HTTP integration, the base URL and the auth mode (service account, client credentials, or user-passthrough). A catalog profile shows its provider-defined auth mode and credential placement read-only. For Custom service-account integrations, select one placement for the API key: bearer, basic, custom header, or query parameter, then fill any placement-specific field. For a connected database (the Azure SQL catalog entry), enter the connection target instead — host, port, and database name — plus the database auth mode: workload identity (recommended — Greenlight connects as its own managed identity, no secret to paste); SQL authentication (a username and password); or a service principal — an Entra app you register in the database’s own tenant, pasting its application (client) ID, its tenant ID, and a client secret. The service principal is the Entra route when the database lives in a different Microsoft Entra tenant than your Greenlight install (a managed identity can’t reach across tenants; SQL authentication also still works there), and works just as well for a same-tenant database when you’d rather grant a dedicated app than Greenlight’s own identity. - Choose how the credential reaches apps. Proxied (recommended and the default for HTTP) — apps call
GREENLIGHT_PROXY_URLand Greenlight swaps in the credential, which never reaches the app. Injected — Greenlight injects the bound credential into the app as an environment variable you name (e.g.HUBSPOT_API_KEY), and the app calls the upstream directly; the name can’t collide with a platform-managed variable. A catalog entry the proxy can’t broker offers only injected. An Azure SQL connected database is always proxied — apps send SQL plus separately bound parameters and receive one bounded JSON result grid; no connection string enters an app. Each authorized call requires a fingerprinted audit event that never stores SQL text or parameter values. - Add the first credential. Registration collects exactly one. For catalog entries, Greenlight auto-generates the stable credential slug
access, but you can edit it directly when you need a custom handle. Use Description to explain what the credential can access, then paste the provider’s key, secret, or password into the Credential field — the empty-field example is specific to that integration (an OpenAI key looks likesk-…, a Slack bot token likexoxb-…). For NetSuite-style certificate M2M, click Generate certificate, download the public certificate to upload in the provider, and copy the Certificate ID back. Auto-approve grants starts on for credentials created during integration registration; turn it off if requests should enter IT review instead. A workload-identity database has no secret — the credential row is just the handle apps bind grants to, and access is whatever role you granted Greenlight’s identity inside the database. Add further credentials later from the integration’s card. - Optionally, write the first Knowledge entry. Registration is often the moment you know most about why this integration is being added — which accounts or warehouses are in scope, which apps may touch it, house conventions. This field is for that: builder-facing context for your coding agents, never credential-acquisition instructions. Leave it blank and the integration simply starts with no Knowledge, same as before.
- Save. Secrets land in your cloud’s managed secret store—write-only, never read back. The integration appears with its credential(s), and your Knowledge entry (if you wrote one) alongside it.
For an Azure SQL connected database, grant access inside the database first: the wizard shows the exact CREATE USER … FROM EXTERNAL PROVIDER / ALTER ROLE db_datareader ADD MEMBER … statements for this installation’s identity (including a SID-based variant when your server lacks a Directory Readers identity), and your DBA runs them with their own credentials — Greenlight never gets admin access. The role you grant is the boundary. db_datareader is recommended; use a separate identity and explicitly named scope for a write-capable role. Also allow Greenlight’s egress address through the database firewall — one source, not every app.
Where the provider allows it, register a dedicated account for the integration (a greenlight@yourcompany service login, say) rather than a person’s own credentials — the same posture Greenlight takes for source control. The integration’s actions then show up separately in the upstream’s own audit logs, and revoking it never locks a human out of their account.
Add a credential
Section titled “Add a credential”Integrations are 1:N with credentials, so an upstream that exposes several keys (a read-only and a read/write GitHub App installation, say) is one integration with two credentials. To add another to an existing integration, open its card, click Add credential, and supply the slug, scope, and secret. Existing grants are unaffected; apps bind to the new slug when they request it.
Edit a credential
Section titled “Edit a credential”Click Edit on a credential row to manage it in the same field order used when adding one. The slug remains visible but disabled because it is the handle apps bind their grants to. You can update the free-text scope and approval policy, or enter an optional replacement secret; leave the secret blank to keep its current value. For an OAuth client-credentials integration the secret is entered as its parts — the client ID plus client secret, or for certificate-based (private_key_jwt) providers the client ID, Certificate ID, and private key (generate a fresh certificate or paste), or for a GitHub App the App ID, Installation ID, and private key — always together, since the stored value is the composed set. Changing a GitHub App installation id here does not re-point the mint; the stored token URL already names the installation. To effectively rename a credential, add a new one under the right slug and have the apps re-declare their grants.
Per-credential policy
Section titled “Per-credential policy”Each credential carries one setting you control on its row:
- Approval policy —
manual(a grant an app declares for this credential lands in the Grants sub-view of the Integrations tab for you to review) orauto(the grant takes effect on merge, shown in the queue as auto-approved by policy). Credentials created during integration registration default toauto; credentials added later to an existing integration default tomanual. You can change either before saving.
Local development follows the grant. For a proxied credential the laptop never holds the secret: local runs call the real proxy with a short-lived, scoped token, and no value ever passes through the agent. For an injected credential, granting it is disclosing it: granted agents and developers can obtain the raw value, including on their own machines, and a value on a developer’s machine can’t be time-bounded or remotely revoked — rotation is the only way back. The dashboard says so at the moments that decide it: when you choose injected delivery at registration, when you approve a grant, and when you revoke one. The revoke confirmation also surfaces pull history so the reviewer can assess whether upstream rotation is needed.
Grant to apps and people
Section titled “Grant to apps and people”Registering an integration does not give anything access to it. Granting happens per credential, per principal — an app, or a person.
Each integration card has one Grants section instead of a separate credential table. Its header shows how many grants bind to that integration, and a small Review needed badge appears when someone is waiting for approval. Each credential sits on its own compact line with its title, description, auto-approval policy, and Edit/Delete actions; the users and apps that requested or hold access are behind a small Access granted to dropdown under each line. Pending rows can be approved or denied there; granted rows can be revoked, using the same confirmation and optional audit reason as the Grants sub-view. Connected-database cards also keep Network connectivity in a closed accordion: its header shows reachability at a glance, while the connection target, egress allowlisting details, and test action stay out of the way until expanded.
App grants arrive from merges: a grant the agent declared in greenlight.yml whose credential is set to manual approval shows up as a pending request once its PR merges.
Personal grants arrive from people: a user’s agent (or the greenlight CLI) calls requestCredentialAccess to ask for that user’s own access — for local scripts and analysis with no app. There is deliberately no request form in the dashboard — requests always come attributed from the requester’s own session; the dashboard is where you review them.
- Open the review queue. The Grants sub-view of the Integrations tab lists pending requests from both apps and people, alongside the full granted inventory. You don’t have to watch it: turn on Permission requests under Settings → Notifications and Greenlight emails every administrator when a merge creates new pending requests — one message per merge, listing each integration, credential, and who asked. It’s off until you enable it, because email needs a configured sender first.
- Approve or deny. Approve to grant; the decision is audited and effective immediately — the principal’s next call to the integration succeeds. A credential set to
autoapproval grants on request without landing in the queue (shown as auto-approved by policy). For an app grant, deciding it emails the app’s owner and co-owners with the outcome — no setting to turn on, since it’s a direct reply to their own request rather than an admin alert. - Revoke any time. Revoking takes effect on the principal’s next call. A person re-requesting after a denial or revocation re-opens the request as pending — policy never overrides your decision.
Rotate credentials
Section titled “Rotate credentials”Rotation lives in two equivalent places: Edit on the credential’s row, and Edit integration, which lists a write-only replacement per credential. Both mirror Add credential: the immutable slug stays visible, the secret fields are optional, and entering a new value replaces the stored one while blank keeps it. Client-credentials secrets are re-entered as their parts (id + secret, or id + certificate + private key, or App ID + installation ID + private key) together. You can generate a fresh certificate for private_key_jwt providers. Changing a GitHub App installation id on rotate does not re-point the mint — the stored token URL names the installation. The slug and every grant bound to it stay exactly as they were.
How quickly running apps see the new value depends on how the credential reaches them. For a proxied credential, the broker resolves it on the next call — there’s no overlap window where both are valid, and no app restart. For an injected credential, the value is baked into each app’s environment at deploy time, so apps already running keep the old value until their next deploy; the edit dialog warns you and lists the apps affected.
If the upstream system’s rotation is automatic (rotating client-credentials tokens, for example), Greenlight follows the upstream’s lifecycle without manual intervention. Every rotation writes an audit event recording the integration, credential slug, and delivery mode — never the secret value.
Delete a credential
Section titled “Delete a credential”When a credential is no longer needed, click Delete on its row and confirm. Deleting deactivates the credential and destroys its cloud-managed secret.
Deletion is guarded: while any app or person holds an active grant (approved or awaiting review) on the credential, Greenlight refuses and the dialog lists the blocking principals with a link to the Grants sub-view filtered to that integration. Revoke each grant there first, then delete — Greenlight won’t pull a credential out from under a live holder. Grants that are already denied or revoked don’t block, and they’re preserved as history: deletion removes the credential from the listing but never erases the audit trail.
The slug stays reserved after deletion — register a replacement under a different slug, and apps re-declare their grants against the new slug.
Edit an integration
Section titled “Edit an integration”Click Edit integration on its card to correct the record without deleting and re-registering it. You can change the display name, the base URL (for an HTTP integration), the non-secret auth parameters — for a Google Workspace integration that includes the OAuth scopes, so scopes entered wrong at registration are fixed here rather than by starting over — the delivery mode and its env var name, and — for a connected database — the host, port, and database name. The machine name, the auth mode, and (for a connected database) the engine stay read-only: each is a handle something else depends on — live app manifests reference the machine name, and the auth mode determines how every credential’s secret is shaped — so correcting one of those means registering a new integration rather than editing in place.
Switching delivery mode between proxied and injected (or renaming the env var an injected credential is injected under) never blocks, but running apps only pick up the change on their next deploy or restart — the same timing as a credential rotation above. If any app holds an active grant on the integration, the dialog lists it so you know who’s affected before you save.
Make an integration inactive
Section titled “Make an integration inactive”Use the Active / Inactive toggle on an integration card when you need to keep its configuration but stop agents and apps from using it—for example, while a production database is awaiting approval. Inactive integrations remain on the IT registry with their credentials, managed secrets, and Knowledge intact. Agents cannot discover the integration, request a grant to it, read its integration Knowledge, or reach it through the proxy or local runtime until you turn it active again.
Deactivation is guarded like deletion: if any app or person has a pending or granted grant, Greenlight refuses and names the blocking access holders. Follow the link to the Grants sub-view, revoke each grant, then retry. Reactivating restores discovery and the preserved Knowledge, but it does not restore revoked grants — apps and people request access again through the normal approval flow.
Use Delete integration only when you intend to destroy its vaulted credentials and permanently reserve its slug. Availability is the reversible control.
Delete an integration
Section titled “Delete an integration”To remove a whole integration, click Delete integration on its card and confirm. The confirmation names every credential and cloud-managed secret that will be destroyed. Deleting deactivates the integration and all its credentials and destroys their secrets in one step.
The same guard applies, one level up: while any app or person holds an active grant (approved or awaiting review) on the integration, Greenlight refuses and the dialog lists the blocking access holders with a link to the Grants sub-view. Revoke those grants first, then delete. Deletion removes the integration from the listing but never hard-deletes the rows, so the grant history is preserved. Two things to know afterward: an app whose manifest still declares a grant against the integration will fail its next merge — to that app it now looks like an integration that was never registered — and the integration’s name stays reserved, so you can’t re-register a new integration under the same name (register under a different name instead).
Revoke an app’s access
Section titled “Revoke an app’s access”To pull one app’s access without deleting the credential, revoke its grant on the Grants sub-view of the Integrations tab (or from the app’s own Access tab). Find the grant, click Revoke, and confirm. The change is audited and immediate — the app’s next call to the integration returns a structured error, and the agent surfaces that failure to the user. Revoke is per-grant, so other apps holding their own grants on the same integration are untouched.
Review agent integration requests
Section titled “Review agent integration requests”Agents don’t request access through a tool call. When an agent decides an app needs an integration, it declares the grant in the app’s greenlight.yml — the integration plus the credential slug — and opens a PR. On merge, Greenlight diffs the declared grants against what the app already has: grants on auto-approval credentials take effect immediately, and anything on a manual credential lands in the Grants sub-view here, with the agent’s stated reason, the bound user, and the app context.
Approve or deny in the same interaction. When you approve, the app’s proxy calls start succeeding immediately — no redeploy.
Review requests to connect a new system
Section titled “Review requests to connect a new system”The requests above are about integrations you have already connected. A separate queue, Requests to connect, sits at the top of the Integrations sub-view and answers a different question: someone’s agent needs data from a system your org hasn’t connected at all.
Those requests come from a builder agent or the CLI — there’s no form a citizen developer fills in. Each row shows the system, who asked, when, and why in their own words.
- Approve & register records your decision and opens the usual Register dialog, already filled in with that system. Approving on its own connects nothing — the integration exists once you finish registering it, exactly as if you’d started from the catalog yourself.
- Decline asks you for a reason and records it. Say what would change the answer: the person can raise the request again later, and a decline they can’t understand just becomes a repeat request.
Connection requests are never auto-approved, whatever a credential’s approval mode says. Connecting a new external system is a bigger decision than widening access to one you already trust, so a person makes it every time.
The queue is only there when something is waiting — an empty state would be permanent furniture on a page you visit for other reasons.
To hear about these by email, turn on Requests to connect a new system under Settings → Notifications. It’s separate from the pending-permission-request category, so you can take one and not the other.